
In this Article
- Linking a Smart Form to a Process
- Managing Smart Form Settings
- Designing/Editing Smart Forms
- Cloning a Smart Form
- Completing a Smart Form without Submission to Quarantine
- Completing a Smart Form for Submission to Quarantine
- Approving Data Submitted Via Smart Form
This article assumes that the Process and Tasks have been created for the Smart Form data collection.
Linking a Smart Form to a Process
Smart Forms need to be linked to Processes so that they can be associated with tasks.
- Go to Processes in the Data Collection menu item.
- Select the process to link a Smart Form to.
- Click the blue 'Edit' button at the top right of the screen.
- Scroll down to the 'Data Source Owner' section of page.
- Select 'Enter data manually into a Smart Form' from the 'Data Source Owner action' drop-down:
- If using an existing Smart Form for this Process, select this from the 'Select a smart form' drop-down;
- If creating a new Smart Form for this Process, select the 'Create a new form based on this process' tick box.
This will create a Smart Form with the same title as the Process.
- Click the green 'Save' button at the bottom right of the page.
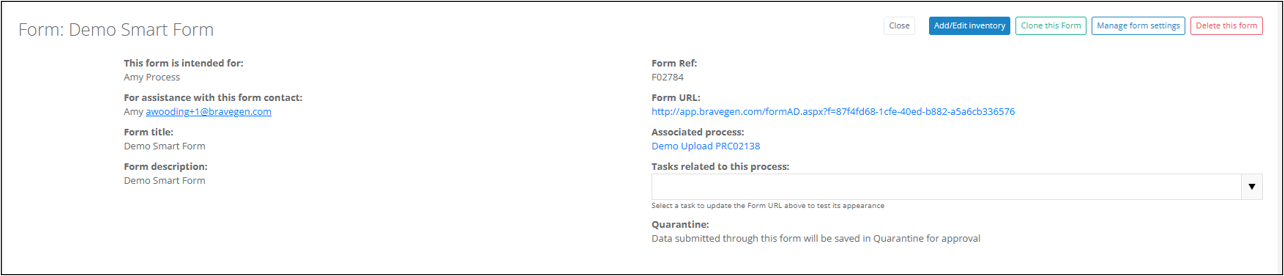
Managing Smart Form Settings
Smart Form settings must be completed before configuring the Smart Form.
- Select the 'Tools' icon to access the Smart Form Settings Page.
This can be accessed from the Smart Forms or Process page (as shown in the video below). - Update the Smart Form Name if required.
This will appear on the Smart Forms page. - Update the Smart Form Title.
This will appear at the top of the Smart Form as seen by suppliers. - Select a name from the 'Form support person' drop-down.
This persons associated email address will appear as a contact at the top of the Smart Form. - Update the 'Form Description' if required.
This is optional and may contain instructions for the person completing the form. - Select the 'Process this form is associated with' from the drop-down.
- Tick 'Should data submitted through this form go in to Quarantine for approval?' if required.
This is optional however, we recommend this as best practice.
- When quarantine is enabled: The form link will automatically be included in the task(s) associated to the process and, will be restricted to the relevant months collection for that task.
- When quarantine is not enabled: The form link will need to be manually entered in the process instructions which will then appear in the task(s) associated. The form will default to the collection of the current month and the previous 12 months of data. Data is saved directly into the system and overwrites any previous data (if any). There is no way to reverse this.
- Tick 'This form is active'.
This must be selected if wanting to collect data using the Smart Form and it will add the link to the task notification. - Click the blue 'Save' button at the bottom right of the screen.
Designing/Editing Smart Forms
Add content to the Smart Form on the Design page by linking inventory items to the form.
- Select the 'Caliper' icon.
The Smart Form Design page can be accessed from either the Process or Smart Forms page (as shown in the video below). - Click the blue 'Add/Edit inventory' button at the top right of the screen.
- Select the appropriate location from the drop-down.
This is where the inventory item is found, e.g. Head Office. - In the '2. Configure the form' section select the default fields that data collection is needed for. These will be applied to all inventory items selected in step 5;
- Untick 'Show the month' if required.
It is best practice to leave this option ticked as this specifies the data collection month. - Tick 'Allow entering of Units' if required.
This can also be used to specify a 'Units label' to clarify the unit of measure for the end user, e.g. kg, tonnes, litres etc. - Tick 'Allow entering of costs' if required.
This can also be used to specify a 'Cost label' to clarify the currency for the end user, e.g. NZD, AUD, USD etc. - Tick 'Allow entering of brief per-month comments' if required.
This allows the end user to add a brief comment for each month of data. - Tick 'Show the Commentary box' if required.
This allows the end user to add overall commentary for the inventory item. - Tick 'Allow files to be uploaded' if required.
This allows the end user to upload relevant documents or evidence relating to the data.
- Untick 'Show the month' if required.
- Select the appropriate inventory item(s) from the drop-down and click the 'Update' button.
The inventory drop-down is filtered and populated based on the location selected. Once the location and inventory have been selected, the items are displayed in the 'Inventory Items selected for the Location' section. - Use the 'Expand All' button to view the configuration of all selected inventory items. Alternatively, click on the panel title to expand the configuration for a specific inventory item.
- Update the Inventory title(s) if required.
By default, this is pre-populated with the location name, inventory name and inventory ID as they appear in the system. - Update the 'Description' field if required.
This is optional and will appear underneath the Title on the form. - Add additional inventory items to the form if required, by following steps 3 - 8 above.
When selecting a new location, the inventory items added from the previous location will not be visible on the screen. - Click the 'Return' button at the bottom left of the screen. Inventory items can be configured individually on this page as shown in the video below.
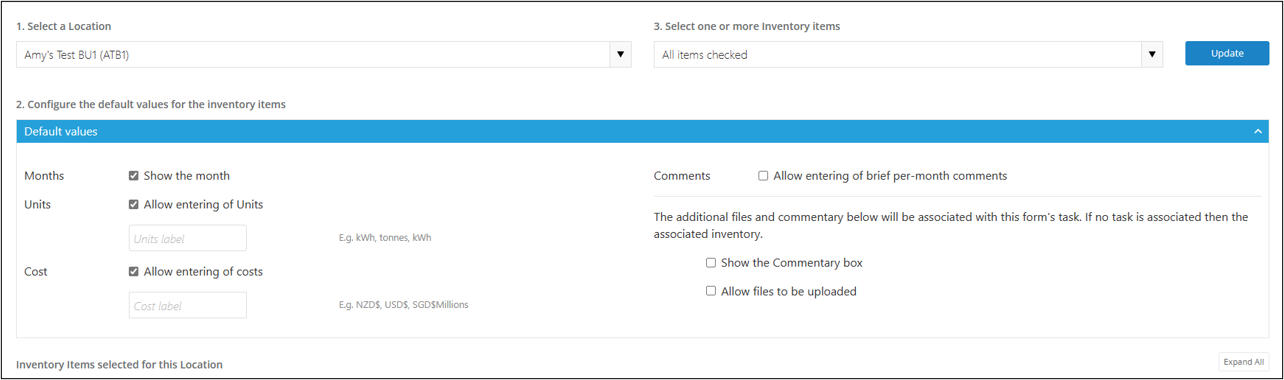
Note: After adding an inventory item to the form, rows for several months will be shown onscreen. This may differ from the actual end users view based on the Quarantine setting. To preview what the end user will see when quarantine has been enabled, select a task from the 'Tasks related to this process' dropdown in the form details panel (this assumes you have created the tasks).
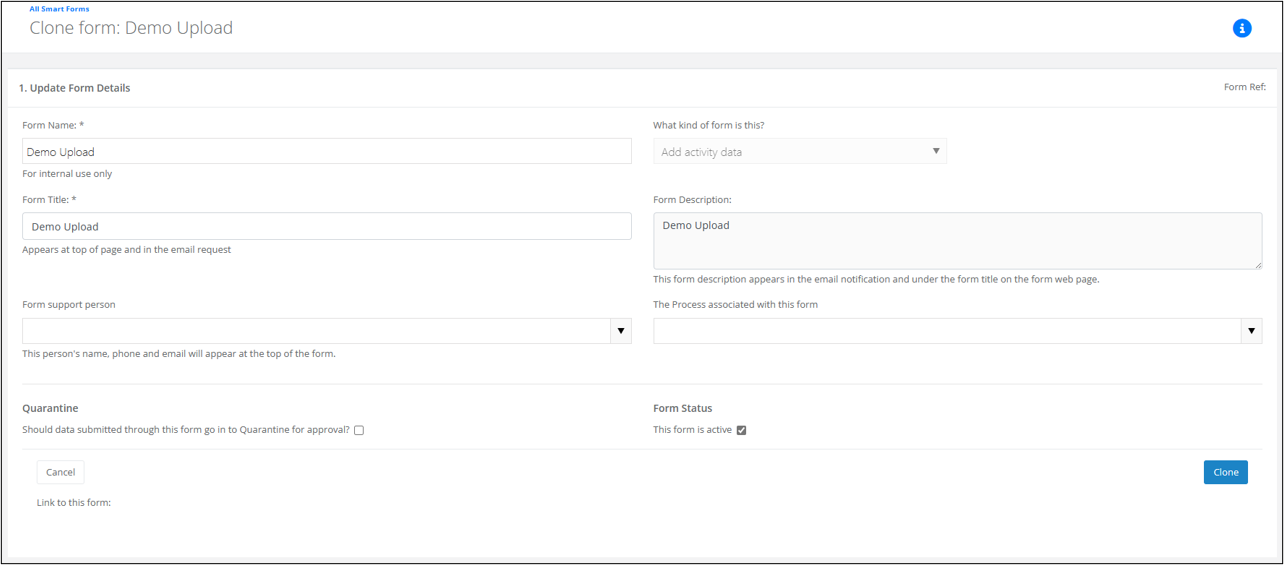
Cloning a Smart Form
This feature allows use of an existing Smart Form as a template for creating a new Smart Form.
- Select the 'Clone' button associated with the Smart Form to copy from on the Smart Form Table (Data Collection > Smart Forms).
Cloning can also be done from within the form Design Page. - Complete the form details in the same way you complete the Smart Form Settings and click the 'Clone' button.
Smart forms need a process to work.
If the process that will be associated with this Smart Form hasn't been created, this can be added later.
Two panels are displayed here; the inventory items on the Smart Form to be cloned and the Smart Form Design panel. - Review the inventory items on for the location being cloned from.
- Select the appropriate location from the drop-down.
This is where the inventory item is found, e.g. Head Office. - Update the default values for the inventory items if required.
- If the inventory items with the same name exist at the newly selected location, these will automatically be checked in the inventory drop down.
- Review these and ensure they are correct.
- If there are inventory at the new location that are not in the source location, you can add these to your selection.
- If inventory exist at the source location that are not in the newly selected location, you have the option to create it from the Clone screen.
- Once inventory is selected, click the 'Update' button.
- Click the 'Go to Design, button to review the new form.

Completing a Smart Form without Submission to Quarantine
The system automatically sends notification emails to users when a task needs to be completed. This email will contain instructions on completing the task and a link to the Smart Form will need to be manually entered in the process instructions.
- Click the Smart Form link.
- Complete all the relevant fields.
Data is saved directly into the system and overwrites any previous data (if any). There is no way to reverse this. - Click the blue 'Save' button.
Completing a Smart Form for Submission to Quarantine
The system automatically sends notification emails to users when a task needs to be completed. This email will contain instructions on completing the task and a link to the Smart Form.
- Click the Smart Form link.
- Complete all the relevant fields.
- Tick the 'IMPORTANT: Have you finished entering data for __?'.
If this is not selected the form will remain open and the task will remain incomplete. - Click the blue 'Save' button.
Approving Data Submitted Via Smart Form
<Coming soon>